REVIEW · AUCKLAND
Coromandel Day Tour From Auckland
Book on Viator →Operated by Auckland & Beyond Tours · Bookable on Viator
A day trip that starts early and ends on the water. This Coromandel outing pairs a quirky train ride at Driving Creek Railway with big views from Eyefull Tower, then layers in geothermal play and a classic coastal walk. It’s the kind of day that feels packed, but not rushed—thanks to a full driver/guide team and planned stops in the right order.
I love how hands-on the schedule is. At Hot Water Beach, you get the tools to make your own mineral-pan setup (yes, a spade is included), plus you can swim or simply stroll along the shore with a towel. A second big win is the Cathedral Cove portion: you get the coastal walkway experience that people talk about for a reason. The main drawback to keep in mind is that the day can shift based on tide timing at Hot Water Beach, and that can affect the exact timing and what’s comfortable in the end stretch.
In This Review
- Key highlights you’ll feel
- Coromandel Day Trip From Auckland: Why It Works So Well
- Getting There Early: Pickup, the Drive Through Waikato, and Bay of Plenty
- Driving Creek Railway and Eyefull Tower: Spirals, Tunnels, and Gulf Views
- Hot Water Beach Mineral Pools: Digging Timing, Swims, and the Spade Trick
- Cathedral Cove Walk: The Iconic Coastline and Why the Hike Fits the Day
- Lunch Is on You: How the Snack Plan Works (and Where to Spend Wisely)
- The Guide, the Vehicle, and the Small Extras That Matter
- Price and Value: Is $284.84 a Fair Deal?
- Who This Tour Suits Best (and Who Might Prefer Something Else)
- Should You Book This Coromandel Day Tour?
- FAQ
- What time does the Coromandel Day Tour start from Auckland?
- How long is the tour?
- What’s included in the tour price?
- Is lunch included?
- What should I bring for Hot Water Beach?
- How many people are on the tour?
Key highlights you’ll feel
- Driving Creek Railway climbs via spirals, tunnels, and reversing points on the way up to Eyefull Tower
- Hot Water Beach mineral pools with a provided spade so you can dig where the hot water shows
- Cathedral Cove is built around a coastal walkway and hike for views that reward your steps
- A real guide makes the day with stories and history (you may hear from guides like Steve or Warren)
- Small group size (max 19) helps the day feel smoother than a big bus crawl
Coromandel Day Trip From Auckland: Why It Works So Well
Coromandel is one of those places that delivers in layers. You get ocean views early, geothermal fun in the middle, and then a postcard-level coast to close the day. The timing matters because nature sets the agenda here—especially at Hot Water Beach—so this tour is built around that reality rather than fighting it.
What makes it a strong option from Auckland is the flow. You’re not left figuring out transport between scattered attractions. Instead, you get hotel pickup in Auckland city center and a full day in an air-conditioned vehicle, with the driving handled for you. That means you can focus on the sights: the train’s odd engineering, the ocean air, and that Cathedral Cove walk.
Group size also matters on a day like this. With a maximum of 19 people, you avoid the chaos of a huge herd. It still feels social, but you don’t lose your day to waiting for everyone to re-find everyone else.
You can also read our reviews of more tours and experiences in Auckland.


Getting There Early: Pickup, the Drive Through Waikato, and Bay of Plenty
Your start time is listed as 6:00 am, and that early departure is part of the value. You’ll leave Auckland central and settle into the scenic drive through the Waikato Region and onward to the Bay of Plenty. Even if you don’t care about road trip scenery, this early timing helps you reach Coromandel-area stops while conditions are best.
On the road, you’ll have snacks, bottled water, and onboard WiFi. That’s not just comfort—it’s practical. A full day with a long drive and multiple activity blocks works better when you’re not suddenly stuck hunting for snacks after a half-hour delay.
Pickup and drop-off are included in Auckland city center, which saves time and avoids the hassle of getting to a meeting point before you’ve even started your day. For a 12-hour outing, that door-to-door convenience is real money in your time.
Driving Creek Railway and Eyefull Tower: Spirals, Tunnels, and Gulf Views
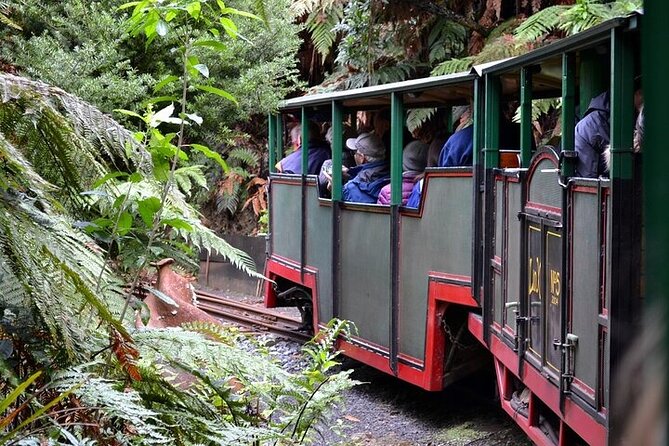
This is the signature “wow” block of the day. At Driving Creek Railway, you’ll take about a one-hour train ride that climbs through spirals, tunnels, viaducts, and reversing points. It’s not just scenery. The ride itself is the attraction, with the track doing clever things as it gains elevation.
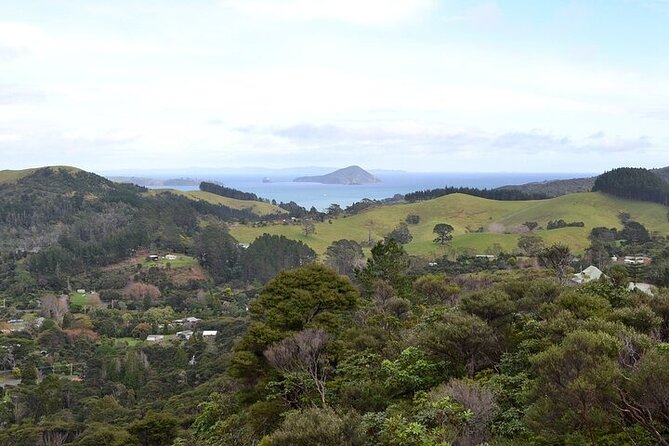
When you reach Eyefull Tower, you’re rewarded with panoramic views over the island-dotted Hauraki Gulf. This is one of the best moments to slow down. You’re high enough to see the coastline and the way the water breaks around the islands, but you’re still close enough to feel connected to the shore.
The guide element matters here. People in the reviews highlight guides like Steve (stories, fun facts, history) and Warren (strong local context). Even if you’re not a “history person,” those small story threads make the train and viewpoints feel more grounded than a stop-and-snap photo loop.
A practical note: this part is scenic, but it’s also active in the sense that you’ll move between the viewing areas and the train itself. Wear footwear you’re happy to walk in. You’ll thank yourself later at Hot Water Beach.
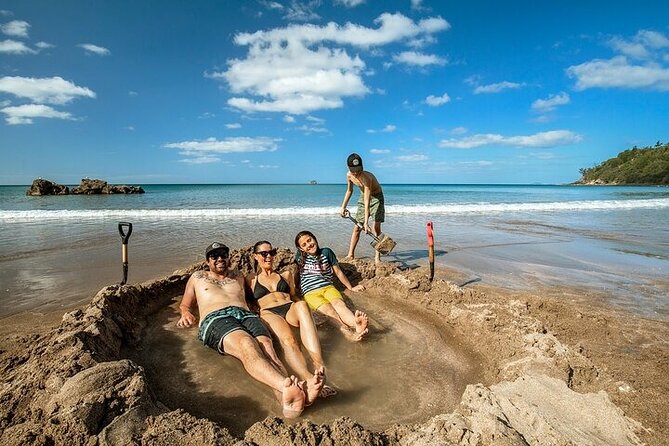
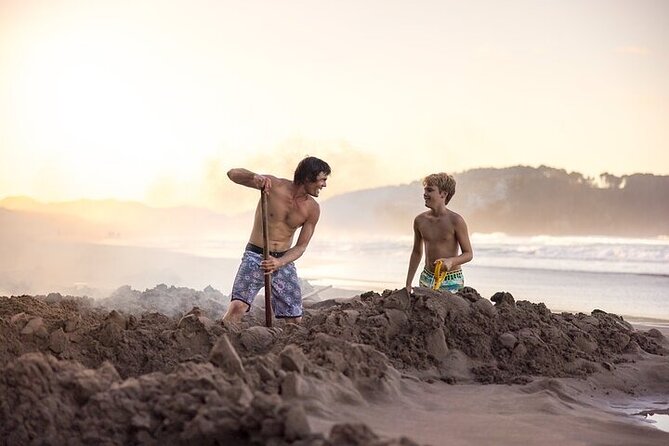
Hot Water Beach Mineral Pools: Digging Timing, Swims, and the Spade Trick
Hot Water Beach is where the tour goes from sightseeing to participation. The mineral pools form along the shoreline based on tide timing. That’s why the tour’s start time may vary according to tide conditions.
Once you’re there, you can relax, swim, or stroll along the shore—your pace, your plan. The big practical win: a spade is provided, so you’re not trying to source one at the last minute. This “dig where the hot water is” style of play is part of the fun, and it’s easy for first-timers to join in.
What to bring is simple and important:
- Swimwear and a towel are must-haves
- Slip-on or easy footwear helps on sand and shallow areas (the reviews specifically warn against forgetting this)
If you’re unsure about swimming, you still get value from the strolling and the atmosphere. Just remember that this is beach time. You’ll be standing around in wet sand, so comfort matters more than style.
One more thing: this stop can feel weather-dependent because it’s outdoors and tied to tide windows. If you want a calmer experience, aim for a steady rhythm—dig, test, then take a break rather than jumping straight into the loudest activity.
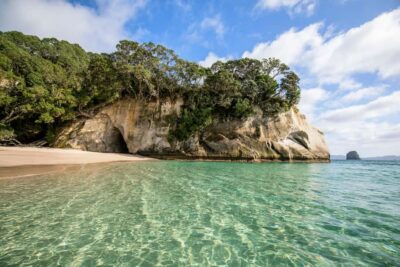
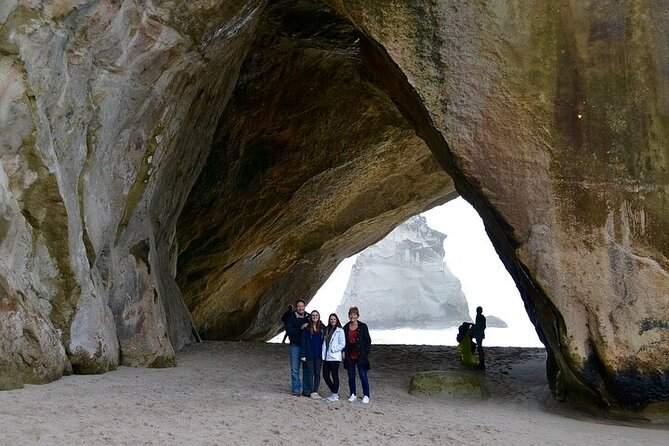
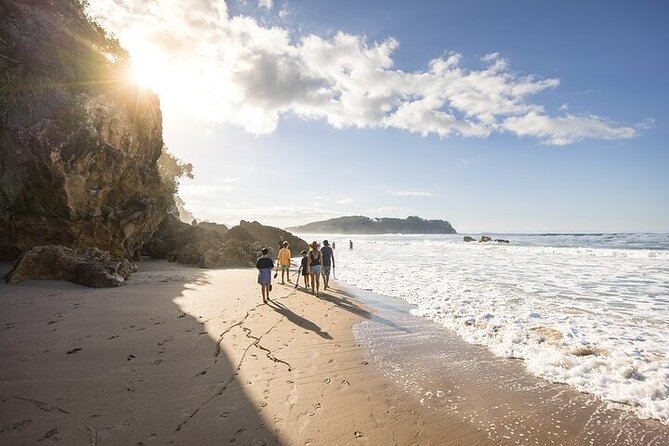
Cathedral Cove Walk: The Iconic Coastline and Why the Hike Fits the Day
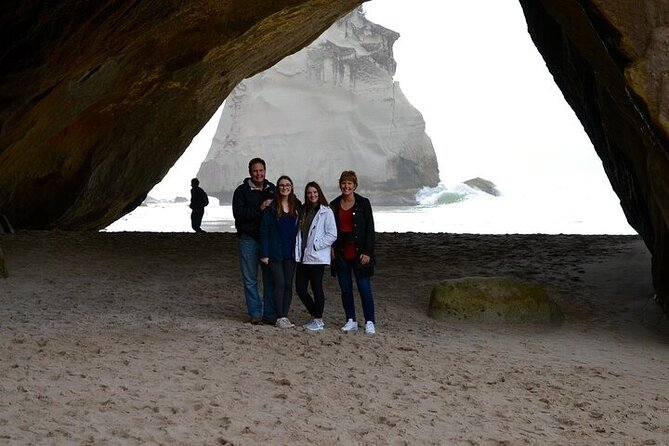
After the geothermal stop, you’ll head to Cathedral Cove on the Coromandel Peninsula. The experience here is built around a coastal walkway and a hike segment that links you to an iconic viewpoint.
The main appeal is that Cathedral Cove isn’t just something you stare at from one angle. It’s a place you approach through a route that gives you changing views and a sense of arrival. That’s why people keep calling it worth the effort in the feedback.
In practice, the walk is also a good pacing choice after Hot Water Beach. You go from shoreline heat and digging to a more classic outdoor stretch. It helps the whole day feel balanced instead of “three passive stops in a row.”
Keep expectations flexible. The tour notes that Cathedral Cove timing can depend on tide times at Hot Water Beach. So while Cathedral Cove is a core highlight, you should be mentally prepared for the day to adjust if tide conditions change what’s comfortable.


Lunch Is on You: How the Snack Plan Works (and Where to Spend Wisely)
Lunch isn’t included, which is both a drawback and a flexible perk. You’ll have snacks and bottled water earlier, and the day is paced so you shouldn’t be starving mid-route. Still, having to buy lunch means you should budget a bit and plan for a sit-down meal when you can.
The reviews mention that rest stops include food options and that a cafe stop can be a highlight. You’ll likely appreciate this structure: quick fuel during travel, then a meal later rather than forcing a packed sandwich situation.
My advice: treat lunch as a local taste opportunity, not just a calorie stop. Coromandel-area cafes tend to be casual and easy, and it keeps the day feeling like a real regional day rather than a checklist.
Also, if you’re someone who gets motion-sick, timing matters. The earlier you eat (and the lighter you go), the easier the day usually feels on long drives.
The Guide, the Vehicle, and the Small Extras That Matter
This tour includes a professional driver/guide, air-conditioned vehicle, onboard WiFi, and hotel pickup/drop-off in Auckland city center. It also includes all taxes, fees, and handling charges, plus all entry tickets & guided tours.
That list may sound admin-heavy, but it matters for your day. When everything’s handled, you’re not stopping to buy tickets at the wrong time, and you’re not guessing which entrance is correct. You also don’t have to coordinate rides back after a train or walk.
The onboard WiFi is a nice bonus, especially if you want to check tide info ahead for your own understanding or map your own photos after the fact. But the bigger comfort piece is the air-conditioned vehicle. A day like this can include warm sun, wet sand, and lots of movement, and you’ll want a comfortable reset on the way back.
One more fun detail from the reviews: you may have a quirky stop connected with pottery. If that’s on your day, it adds a small craft layer between nature stops. It’s the kind of “in-between” activity that makes the day feel more like a tour and less like a shuttle.
Price and Value: Is $284.84 a Fair Deal?
At $284.84 per person for an approximately 12-hour day, the price can look steep—until you break down what you’re getting.
You’re paying for:
- Auckland central pickup and return
- A full driver/guide day
- A vehicle for the whole scenic route
- Included admission and guided touring blocks (train + major attractions)
- Snacks, bottled water, and comfort features like A/C and WiFi
And crucially: the day is structured around timing. Hot Water Beach tied to tide windows can be tricky. When a tour handles that timing for you, you’re effectively paying to avoid the “wrong tide” disappointment and the logistics scramble.
Lunch not being included is the clearest extra cost. But for many people, the included tickets and the convenience of a full day plan offset that gap. If you’re doing Coromandel as a solo DIY day, you’d still need transport plus tickets plus the mental overhead of tide timing. This tour removes a lot of that friction.
If your priority is maximizing nature time with minimal planning, the value is strong.
Who This Tour Suits Best (and Who Might Prefer Something Else)
This tour is a great match if you want a guided day that hits multiple Coromandel icons without you doing the heavy lifting.
You’ll probably love it if you:
- want a day trip with a mix of geothermal fun and ocean views
- enjoy rail-style curiosities and don’t mind a couple hours of active walking and viewpoint moving
- like having a guide who adds stories and context (people often mention the energy from guides like Steve and Warren)
It may not be the best fit if you:
- hate schedule shifts tied to tide/weather
- want total control over timing and meals
- prefer fewer stops and more free time at one location
Also, the max group size is 19, so it can still feel social. If you’re a solo traveler who wants silence the entire day, you might find a guided format a bit chatty.
Should You Book This Coromandel Day Tour?
I’d book it if your goal is a high-impact Coromandel day from Auckland without stress. The combination of the Driving Creek Railway climb, the Eyefull Tower gulf views, and Hot Water Beach mineral pools is a strong trio. Add Cathedral Cove’s coastal walkway and you get a day that feels like you visited the region, not just passed through.
The one reason to pause is tide timing at Hot Water Beach. If that timing doesn’t line up well with your personal schedule, or if you’re hoping for a very fixed itinerary, you’ll want to be flexible.
If you want the easiest path to a memorable day—pickup, tickets, guidance, snacks, and the right order—this is a solid choice.
FAQ
What time does the Coromandel Day Tour start from Auckland?
The listed start time is 6:00 am. The exact start time may vary based on tide times at Hot Water Beach.
How long is the tour?
It runs for about 12 hours (approx.).
What’s included in the tour price?
You get hotel pickup and drop-off in Auckland city center, an air-conditioned vehicle, onboard WiFi, snacks, bottled water, professional driver/guide service, and entry tickets for the guided tours.
Is lunch included?
No. Lunch is not included.
What should I bring for Hot Water Beach?
You should bring swimwear and a towel. Slip-on or easy footwear is also a smart idea for wet sand areas.
How many people are on the tour?
The tour has a minimum of 4 people and a maximum of 19 travelers.